How to Install Airstream Travel Trailer Padded Window Covers
There are two short videos that show the installation process described below, which you can view on YouTube at:
- How To Install Dual Lock On Center Window Hinge
- How to install Airstream Travel Trailer Padded Window
IMPORTANT! READ THIS PRIOR TO INSTALLATION
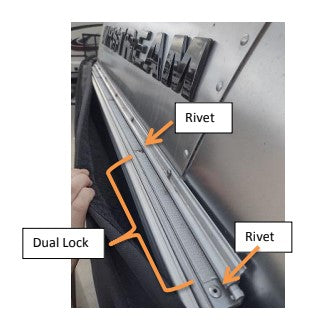
Although no hardware is required for your cover, you will need to install the provided adhesive Dual Lock (aka Velcro®) on the top of the center window hinge. This helps keep the center of the cover tight against the trailer. The dual lock is barely visible once installed, and can be removed later if desired without damaging the surface. It will not interfere with the window opening.
The dual lock comes pre-cut into four strips. The strips should be placed in between the rivets on top of the hinge. DO NOT place the strips on top of any rivets, as this will create a bubble and prevent good adhesion. Read below for important installation instructions.
Install Dual Lock
Step 1: Clean Surface
Before installing the Dual Lock, it is essential to clean the surface thoroughly. The instructions below are more extensive than shown in the video, so please follow these more detailed instructions for best adhesion.
The cleaning process below is to remove the oil residue and dirt from the road, which can be hard to see and may not be obvious. If you do not follow the steps below fully, you may just be pushing road oil and dirt around rather than removing it. This can cause adhesive failure.
- Option 1: Use a dry paper towel to wipe the area to remove any oil or grime that you can.
- Option 2: Use Windex and a new paper towel to clean the area again. The Windex will help loosen additional oils and debris.
- IMPORTANT: Use the provided alcohol pad now to thoroughly clean the area again.
- Next: Wipe the area you just cleaned again with a new dry paper towel to ensure all hidden oils are removed.
Step 2: Install Dual Lock
Working with one piece at a time, remove the plastic backing from the dual lock, and stick it down in between the rivets. The adhesive is pressure sensitive, so you must PRESS FIRMLY all along the entire strip for several seconds to ensure good adhesion.
Step 3: Let Adhesive Cure
Allow the adhesive to cure, ideally for several days when installed at temperatures above 50 degrees Fahrenheit.
For temperatures 50F and below: Allow the Dual Lock to sit in the sunlight without the cover on for at least three days to help provide warmth and promote full adhesion.
Cover Installation
PLEASE NOTE: Allow time to practice putting the cover on. Read the tips below before you put it on the first time. The cover has a tight fit to help it stay securely in place. It will be difficult to put on the first time or two, but rest assured, it will be easy once you’ve done it a couple of times.
You will need a step stool or small ladder three that allows you to see over the top of the windows. Installation will be easier with two people, but can also be accomplished alone.
Step 1: Hinges
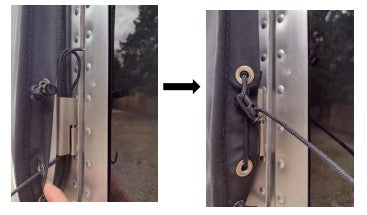
1. Start with the top hinges. On one side, position the cover so you can pass the rope behind the hinge and through the lower grommet on the cover. Then squeeze the cord lock and pass the rope through the lock. The cover should now be held in place on that hinge. The rope should not be tight – just so the cover can’t fall to the ground.
2. Firmly tug and pull the cover around to the opposite side, and fasten the rope behind the other top hinge. It will take some effort to pull the cover into place to get the rope fastened on the opposite side. Again, it does not need to be tight – just so it is loosely held in place on the window. Leave the bottom hinge ropes unfastened for now.
Step 2: Work Elastic Pocket Around the Window
Starting at the top outer corners (where the hinges are), pull the elastic pocket around the top corners of the windows. Then work in the middle top area to make sure the elastic pocket rests on top of the windows and is not tucked behind itself. However, do not secure the velcro at the top of the center window yet; this is done last. Once the corners are in place, tighten the rope behind the top hinges to help keep things in place.
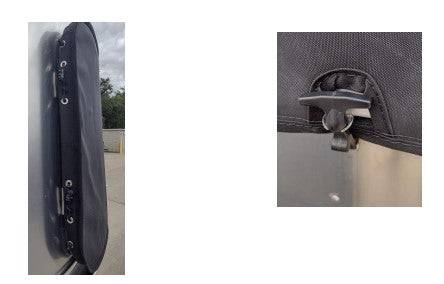
Next move to the bottom of middle window. Start with the fasteners that hold the center window closed. Unhook the rubber fastener from its bracket so that it hangs down. Pull the cover down to allow the metal bracket to poke through the bracket opening on the cover. Re-fasten the rubber fastener on top of the cover.
Still in the middle bottom window, pull the elastic pocket around the bottom of the window so that it sits below the window and is not tucked behind itself. Work out toward the corners.
When you get to the corners, pull the cover around the corner and loosely fasten the rope behind the bottom hinges, just as you did for the top hinges.
Once both bottom corners are in place, secure the rope behind the bottom hinges as you did for the top hinges.
Step 3: Secure the Hinges
Tighten the cord behind the hinges to a tight fit, and secure the cord
end by twisting it around itself and back through the lower grommet.
Step 4: Fasten the Dual Lock
Pull the center of the cover up over the middle window to match the dual lock on the cover up with the dual lock on the window hinge, and press in place.
Finally, tug on the cover to make sure it is firmly in place.
For a printable page of instructions, please click here