


Airstream Wood Dinette Table Upgrade for Globetrotter Travel Trailers
Shipping calculated at checkout
Shipping FAQ
Shipping Carrier
Order Processing Time
Return Policy
Upgrade Your Airstream Dinette Table with Solid Wood Craftsmanship
Made with pride. Built to travel. Designed to inspire.

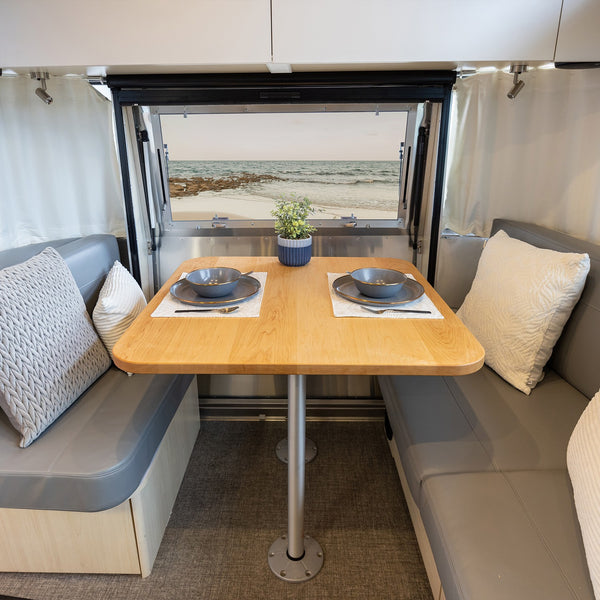
Pictured above is a Flying Cloud hatch model with a maple dinette tabletop
Transform your Airstream’s interior with our premium wood dinette tables, a beautiful and functional upgrade for those who appreciate natural materials and timeless design. Made from locally sourced hardwoods and finished with a durable, furniture-grade sealant, these tables add warmth, character, and lasting quality to your travel space.
Each dinette table is carefully crafted from locally sourced, hand-selected hardwood—chosen for its strength, beauty, and character. Built with pride and designed for life on the road, this is more than a table. It’s a centerpiece for meals, memories, and moments shared in your Airstream. Whether you’re restoring a vintage Airstream or upgrading a modern model, this table adds warmth, style, and long-lasting quality to your living space.
Product Highlights
- Built for Airstream – Designed to match the original table dimensions of your Airstream trailer for a perfect fit.
- Heirloom-Quality Hardwood – Each top is crafted from solid 1.2" thick walnut, maple, cherry, or oak—sustainably harvested and locally milled.
- Hand-Finished to Last – Finished with multiple coats of a hand-applied, furniture-grade satin sealant for lasting protection and beauty.
- Stabilized Against Warping – Underside relief channels help control seasonal wood movement in changing climates.
-
Easy DIY Installation – Reuses your existing pedestal and brackets. No need for new hardware or professional help.
The Process: Built by Hand, Start to Finish
We believe beautiful wood deserves more than a factory finish. Here’s how our craftsman prepare your table:
- Wood Selection – Each board is hand-selected for consistent grain, color, and structural integrity.
- Precision Milling – Custom milled in-house to size and shape based on original Airstream drawings for each model.
- Protective Finish – We apply multiple coats of a durable clear satin finish to enhance and protect the grain while preserving natural beauty.
- Careful Packaging – Each tabletop is shipped in custom packaging to ensure safe transit.
Wood Options

We offer four beautiful hardwood options for our dinette table upgrades. Walnut, cherry, and maple provide rich solid-color finishes in dark, medium, and light tones—perfect for a clean, modern look. For those who prefer a more textured, dimensional feel, our oak tables showcase the natural grain of the wood and are available in dark, medium, and light washes to complement a variety of interior styles.
Not sure what wood style would look best in your trailer? Order wood samples to compare and pick your favorite before ordering. Order samples here.
Installation Notes
-
- Tabletop only—pedestal and hardware not included.
- Designed for re-use of your factory-installed pedestal and bracket system.
- No special tools required—just a screwdriver and drill.
- Installation typically takes 10–15 minutes
Leg Attachments
Looking to upgrade your table leg attachments along with your tabletop? We offer two options:
-
- Airstream pedestal table- Part #382073
- Airstream threaded-lock base and leg system- Part #382722-02, 382723, 382724
Product Features
Airstream Wood Dinette Table Upgrade Instructions
Recommended Tools:
- Power Drill
- Hardware from original table
- Drill bits
- Phillips Head screwdriver
- Tape measure
- Straight Edge
- Masking Tape + Marker
Notes:
- The inset steel stiffeners built into the replacement tables are designed to prevent warping while still allowing for natural expansion and contraction due to humidity changes.
- Important Warning: Do not drill all the way through the Wood Dinette Table Upgrade.
- Pro Tip: Always verify your measurements before removing any hardware from the original table.
Table Care & Maintenance
To preserve the beauty and longevity of your table, we recommend the following care:
-
Routine Cleaning:
Gently wipe the surface with a soft, damp cloth to remove dust and debris. Dry thoroughly with a clean cloth to maintain the finish. -
Deeper Cleaning:
For more stubborn residue, a small amount of mild dish soap diluted in water may be used. Avoid excessive moisture and dry immediately after cleaning. -
Surface Protection (Optional):
Periodic application of a high-quality furniture paste wax can help maintain the luster and provide an added layer of protection. Airstream Cutting Board Wax – Airstream Supply Company -
Finish & Repair:
Each table is finished with Osmo Polyx Hardwax Oil 3043, a premium, durable coating designed for both beauty and resilience. Should the surface experience wear over time, this finish allows for straightforward touch-ups, restoring the table with ease.
How to Install a Wood Dinette Table Upgrade with a Single Leg
Bambi 16RB is shown in the instructional video
-
Remove the Existing Table
- Fold the table leg down and lower the table.
- Remove the two set screws securing the hinge bar to the trailer.
- Detach the hinge bar (hardware will remain attached).
- Remove the tabletop and place it on a padded surface to avoid damage.
- Remove the black numbers (pegs). Tip: It may be easier to use a manual screwdriver due to tight spacing.
- Remove the table leg.
- Detach the two hinge brackets.
-
Install the Wood Dinette Table Upgrade
-
Prepare the table surface
- Place the Wood Dinette Table Upgrade on a padded surface to protect it during installation.
-
Install the folding table leg
-
Use masking tape and a marker to mark where the leg will be mounted. Center the leg widthwise and reference your original tabletop for alignment.
-
Mark a centerline down the table to help with placement.
-
Align the table leg with your markings, ensuring it's square to the table edge.
-
Trace the mounting holes onto the tabletop.
-
Drill pilot holes for the screws.
-
Tip: Use masking tape on the drill bit to mark the depth. Make sure the bit is smaller than the screw diameter.
-
-
Remove the tape.
-
Reuse the original screws to attach the leg over the drilled holes.
-
-
Install the bumpers (black pegs)
-
Use masking tape and a tape measure to mark the bumper locations. Reference your original table for accuracy.
-
Drill pilot holes.
-
Tip: Use masking tape on the drill bit to mark the depth. Make sure the bit is smaller than the screw diameter.
-
-
Remove the tape.
-
Use a manual screwdriver to install each bumper snugly.
-
Repeat for the other bumpers
-
-
Attach the hinges
-
Use masking tape to mark where the hinge brackets will be places, matching the inset distance from the original table.
-
Mark the screw hole locations.
-
Drill pilot holes.
-
Tip: Use masking tape on the drill bit to mark the depth. Make sure the bit is smaller than the screw diameter.
-
-
Remove the tape.
-
Repeat the process for the second hinge bracket.
-
Retrieve the hinge bar and the screws from your original table.
-
Attach the new brackets to the hinge bar.
-
-
-
Install the Wood Dinette Table Upgrade in Your Airstream
-
Set the new table into position inside the travel trailer and snap the hinge bar into place.
-
Reinstall the set screws to secure the hinge bar to the trailer wall.
-
Fold the table into the wall brackets.
-
Pull down the table leg to support the tabletop.
-
Click here to download a print version of the instructions
How to Install a Wood Dinette Table Upgrade with Dual Table Legs
Flying Cloud is shown in the instructional video
-
Remove the Existing Table
- Lift the tabletop off the two table legs and place on a padded surface.
- Remove the existing mounting hardware from the underside of the tabletop.
-
Install the Wood Dinette Table Upgrade
-
Prepare the table surface
- Place the Wood Dinette Table Upgrade on a padded surface to protect it during installation.
-
Install the bumpers (black pegs) Note: Exact bumper placement is flexible, but it's helpful to reference your original table.
-
Use masking tape and a tape measure to mark the approximate bumper locations.
-
Drill pilot holes.
-
Tip: Use masking tape on the drill bit to mark the depth. Make sure the bit is smaller than the screw diameter.
-
-
Remove the masking tape.
-
Secure the bumpers snugly.
-
Repeat for all bumpers.
-
-
Install the leg caps
-
Locate the two caps that hold the legs in place.
-
Run a long strip of masking tape lengthwise down the center of the table to help with alignment.
-
Find the center point for the first leg cap.
-
Tip: Refer to your original table for correct positioning.
-
-
Measure the spacing for the second leg cap and mark its center point.
-
Take one cap and align two of its mounting holes with your center mark.
-
Trace all screw holes onto the masking tape.
-
Set the cap aside and drill pilot holes for the screws.
-
Tip: Use masking tape on the drill bit to mark the depth. Make sure the bit is smaller than the screw diameter.
-
-
Remove the masking tape from the table surface.
-
Tip: Leave a half of the centerline in place to help align the second cap.
-
-
Screw the first cap into place.
-
Repeat the process for the second cap.
-
Once both caps are installed, place the Wood Dinette Table Upgrade back onto the legs.
-
-
Click here to download a print version of the instructions
How to Install a Wood Dinette Table Upgrade for a Basecamp
Basecamp Xe is shown in the instructional video
-
Installing the Rear Tables
-
Remove the existing rear tables
-
Lift and remove the two rear tables from the table legs.
-
Place the tabletops on a padded surface.
-
Remove any remaining hardware from the underside of these tables.
-
-
Install the Wood Dinette Table Upgrade
-
Apply masking tape across the underside of the Wood Dinette Table Upgrade to help mark placement.
-
Use a straight edge to draw a centerline down the tape.
-
Reference your original table to measure where the leg caps should be placed. Align them with the centerline.
-
Position the first cap and trace its screw holes onto the tape.
-
Drill pilot holes.
-
Tip: Use masking tape on the drill bit to mark the depth. Make sure the bit is smaller than the screw diameter.
-
-
Remove the masking tape from the table.
-
Align the cap with the drilled holes and secure it using screws.
-
Repeat this process for the second table.
-
Place both tables back onto the table legs.
-
-
Click here to download a print version of the instructions
-
Installing the Front Dinette Table
-
Remove the existing table
- Remove the original tabletop from the dinette.
-
Installing the Wood Dinette Table Upgrade
-
Lower the leg so it's in position and aligned with the dinette bench seating.
-
With the table on the leg, trace the position of the mounting hardware onto the underside of the new table.
-
Remove the table and place it on a padded surface.
-
Drill pilot holes.
-
Tip: Use masking tape on the drill bit to mark the depth. Make sure the bit is smaller than the screw diameter.
-
-
Set the Wood Dinette Replacement Table back on the leg stand.
-
Ensure the tabletop is flush, aligned, and level with the bench seating. Some adjustments may be needed.
-
-
Align the screw holes in the table with the hardware mounted to the leg.
-
Secure the hardware to the table using the screws.
-
-

VISIT THE MOTHERSHIP
Take a factory tour, step back through Airstream history in our Heritage Center, and grab some authentic Streamer gear.
MADE JUST FOR YOU
From custom-sized bedding to teak mats and replacement curtains we have all the custom goods that are made especially to fit your home on wheels.