How to Install Argosy Padded Window Covers
VERY IMPORTANT – READ THIS BEFORE INSTALLING!
In addition to reading these instructions below, you can view a video of the installation process available here.
Airstream Argosy Side Window No-Drill Snap Installation Instructions
Step 1. Prepare the cover by snapping the adhesive snaps onto the existing snaps on the back of the cover. Do no remove the paper backing yet.
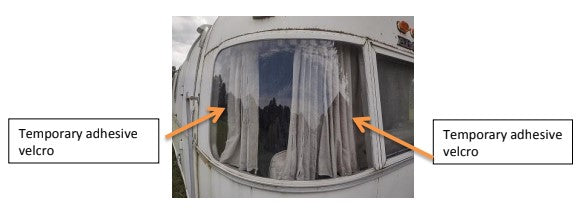
Also install the provided adhesive velcro in the sides of each window. This velcro is only temporary and will be used to help hold the cover in place during the installation process.
Step 2. With a helper, place the cover onto the window using the previously applied adhesive velcro to hold it in place. Adjust the position of the cover up and down and side to side until the cover is smooth and sits evenly around the entire window.
With the cover in place, peek behind the cover to examine the snap locations to be sure the adhesive snaps will land on the window, not on the metal window frame outside the window.
Step 3. Pick one of the corner snaps to install first – it doesn’t matter which one. Follow steps 4 and 5, below, to install the first snap.
Step 4. VERY IMPORTANT. Clean the window surface thoroughly as described below before applying the snap. For the first snap, lift the template up to clean underneath.
It is EXTREMELY IMPORTANT to clean the window surface well before applying the adhesive snaps. The cleaning process below is to remove the OIL RESIDUE and dirt from the road, which can be hard to see and may not be obvious. If you do not follow the steps below fully, you may just be pushing road oil and dirt around rather than removing it. This can cause snap failure.
- Use a dry paper towel to wipe the area to remove any oil or grime that you can.
- Use Windex and a new paper towel to clean the area again. The Windex will help loosen additional oils and debris.
- IMPORTANT! Use the provided alcohol pad now to thoroughly clean the area again.
- Final step. Wipe the area you just cleaned again with a new dry paper towel to ensure all hidden oils are removed.
Step 5. Remove the adhesive backing and press the snap firmly in place. DO NOT remove the snap from the cover to install it. Keep the snap on the cover, remove the backing, and press on it firmly against the window from the outside of the cover.
IMPORTANT: The adhesive on the snaps is pressure sensitive. After applying, you need to press firmly all around the snap – around all the edges and in the center– for a good 10-15 seconds. Sufficient pressure is necessary to obtain good adhesion.
Step 6. Repeat steps 4 and 5 for the remaining 3 corner snaps, and then for the other remaining snaps. Re-examine where each snap will land as you go and make adjustments as needed.
Step 7. When done with snap installation, carefully remove the cover from the window. After removing the cover, press firmly for several seconds on each snap again, to make sure they are firmly adhered to the window. Remove the temporary adhesive velcro from the window. If any adhesive residue from the
velcro remains, remove it with rubbing alchol, or, if needed, Goo Gone or a similar adhesive remover, which can be purchased at any hardware store.
Step 8. The following is recommended in all temperatures, but for sure in temperatures 50 degrees F and below: Allow the snaps to sit in the sunlight without the cover on for a handful of days to help provide warmth to promote full adhesion.
Airstream Argosy Full Window No-Drill Snap Installation Instructions
Step 1. Prepare the cover by snapping the adhesive snaps onto the existing snaps on the back of the cover, except for in the top center. Top center is indicated by the CoolCustomCanvas.com label. Do no remove the paper backing yet.
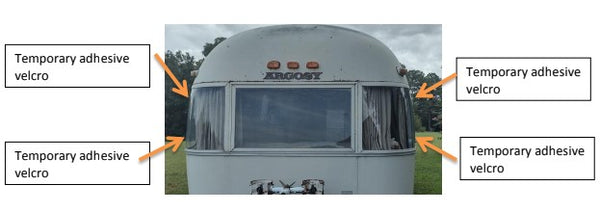
Also install the provided adhesive velcro in the outside corners of the trailer window. This velcro is only temporary and will be used to help hold the cover in place during the installation process.
Step 2. Locate center on the top and bottom of the window. Install tape at the center on the metal frame just outside the window, and mark a line on the tape to indicate the exact center positions, top and bottom.
Step 3. Determine the position of the top center snap using the provided cardboard template. Hold the template at the upper edge of the window, and align the center line of the template with the center line you made on the tape. Secure the template in this position using additional tape. Run the tape vertically up to the metal window frame, so that you can still lift up the template to clean the window
underneath.
Step 4. VERY IMPORTANT. Clean the window surface thoroughly as described below before applying the snap. For the first snap, lift the template up to clean underneath.
It is EXTREMELY IMPORTANT to clean the window surface well before applying the adhesive snaps. The cleaning process below is to remove the OIL RESIDUE and dirt from the road, which can be hard to see and may not be obvious. If you do not follow the steps below fully, you may just be pushing road oil and dirt around rather than removing it. This can cause snap failure.
- Use a dry paper towel to wipe the area to remove any oil or grime that you can.
- Use Windex and a new paper towel to clean the area again. The Windex will help loosen additional oils and debris.
- IMPORTANT! Use the provided alcohol pad now to thoroughly clean the area again.
- Final step. Wipe the area you just cleaned again with a new dry paper towel to ensure all hidden oils are removed.
Step 5. Apply the top center snap. With the template in place, remove the paper backing on the adhesive snap, and place it in the center hole of the template.
IMPORTANT: The adhesive on the snaps is pressure sensitive. After applying, you need to press firmly all around the snap – around all the edges and in the center– for a good 10-15 seconds. Sufficient pressure is necessary to obtain good adhesion.
Step 6. With a helper, place the cover onto the window using the previously applied adhesive velcro to hold it in place. The single top snap is not strong enough to support the entire cover, so you will need to use the velcro at this stage. Adjust the position of the cover up and down and side to side until you can
snap the top center snap in place and until the cover is smooth and sits evenly around the entire window.
With the cover in place, peek behind the cover to examine the remaining snap locations to be sure the adhesive snaps will land on the window, not on the metal window frame outside the window.
Step 7. Now install the bottom center snap by repeating steps 4 and 5. DO NOT remove the snap from the cover to install it. Keep the snap on the cover, remove the backing, and press on it firmly against the window from the outside of the cover.
Step 8. Continue working outward from center, installing snaps one at a time, alternating top and bottom. Repeat steps 4 and 5 for each snap.
Step 9. When done with snap installation, carefully remove the cover from the window. After removing the cover, press firmly for several seconds on each snap again, to make sure they are firmly adhered to the window. Remove the temporary adhesive velcro from the window. If any adhesive residue from the
velcro remains, remove it with rubbing alcohol, or, if needed, Goo Gone or a similar adhesive remover, which can be purchased at any hardware store.
Step 10. The following is recommended in all temperatures, but for sure in temperatures 50 degrees F and below: Allow the snaps to sit in the sunlight without the cover on for a handful of days to help provide warmth to promote full adhesion.
For a printable page of instructions, please see here